Landscape Brick Calculator
Estimate patio and path pavers laid flat, garden edging bricks by the linear foot, base sand volume, and polymeric joint sand, with pattern waste built in for cuts and layout loss.
🧱Landscape Project Presets
📝Project Inputs
Area mode fills a surface with pavers. Edging mode lines a border with brick-on-edge.
Plan-view length × width of the face laid flat, in inches.
Longer side of the patio or path. Used in area mode.
Shorter side or path width. Used in area mode.
Total run of border, bed, or ring. Used in edging mode.
Tight sand-set joints are about 1/8 in. Wider joints lower paver count.
Bedding sand layer under pavers, typically 1 in over compacted gravel.
🔢Core Formula Snapshot
🧱Paver Size to Coverage
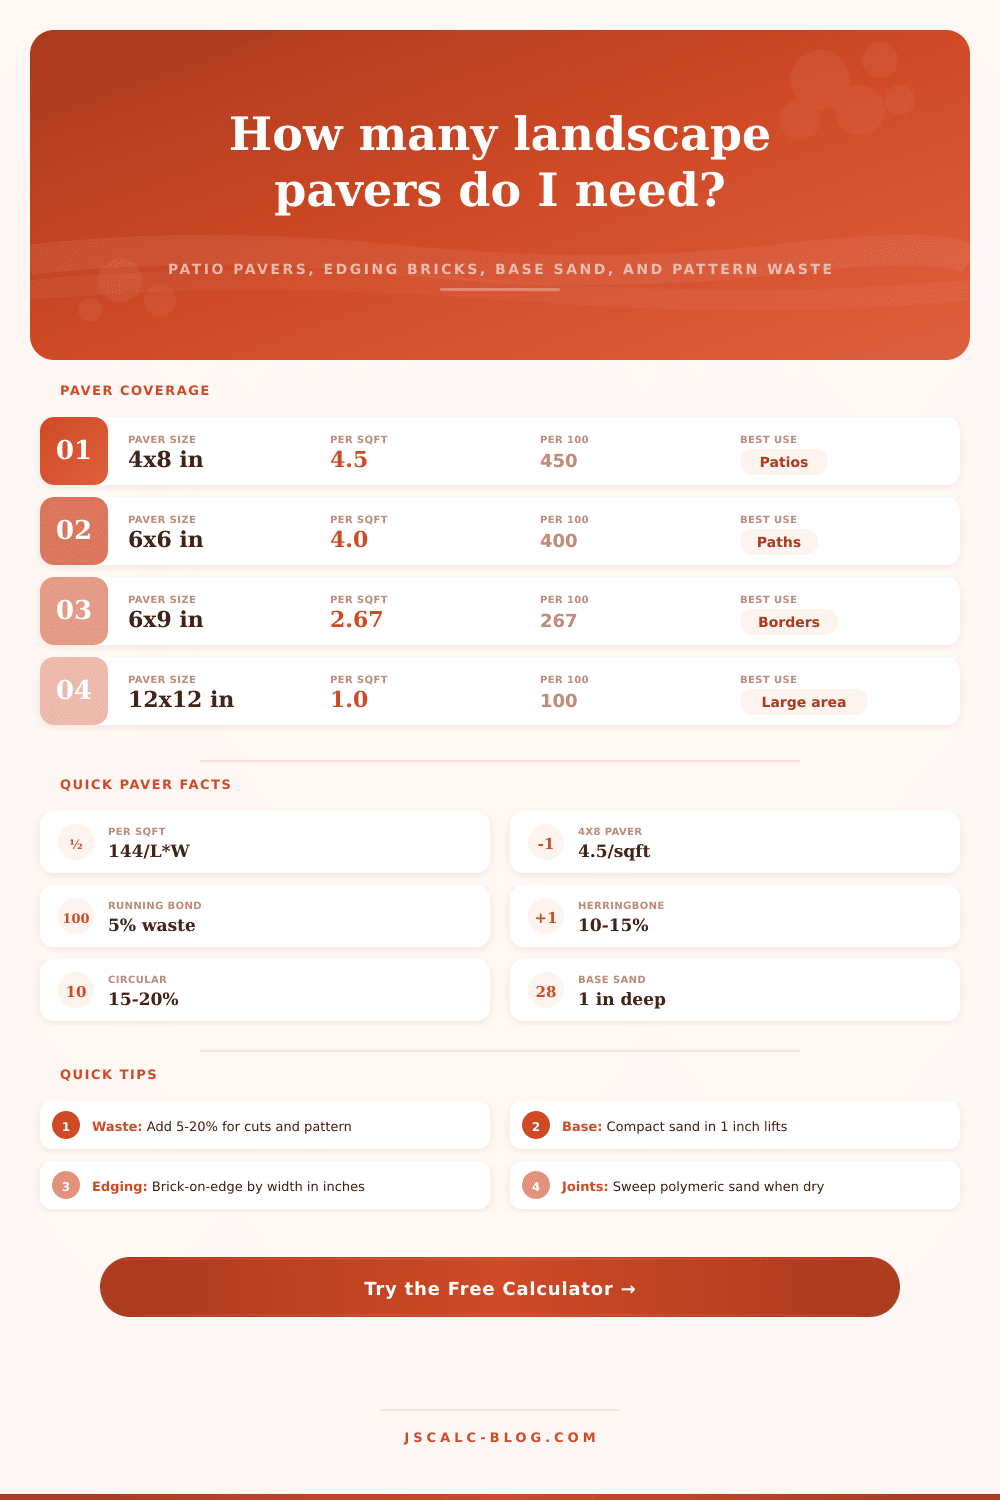
| Paver Size (in) | Face Area | Pavers / Sq Ft | Pavers / 100 Sq Ft | Common Use |
|---|---|---|---|---|
| 4 × 8 | 32 sq in | 4.50 | 450 | Patios, paths, herringbone |
| 6 × 6 | 36 sq in | 4.00 | 400 | Paths, accents, borders |
| 6 × 9 | 54 sq in | 2.67 | 267 | Holland pattern paving |
| 8 × 8 | 64 sq in | 2.25 | 225 | Grid patios, courtyards |
| 8 × 16 | 128 sq in | 1.13 | 113 | Plank and ashlar layouts |
| 12 × 12 | 144 sq in | 1.00 | 100 | Slabs, pool decks |
| 12 × 18 | 216 sq in | 0.67 | 67 | Large-format modern patios |
🔃Pattern Waste and Sand Guides
| Laying Pattern | Waste Factor | Cut Frequency | Best For |
|---|---|---|---|
| Running bond | 5% | Low, edge cuts only | Paths and simple patios |
| Stack bond / grid | 8% | Low to moderate | Square modern layouts |
| Basketweave | 10% | Moderate | Traditional brick patios |
| Herringbone 90° | 12% | Moderate | Driveways and aprons |
| Herringbone 45° | 15% | High, many angle cuts | Feature patios |
| Circular / fan | 18% | Very high | Fire pits and rings |
| Layer | Typical Depth | Coverage per Cu Yd | Purpose |
|---|---|---|---|
| Bedding sand | 1 in | 324 sq ft | Level setting bed for pavers |
| Bedding sand | 1.5 in | 216 sq ft | Thicker screed for uneven base |
| Gravel base | 4 in | 81 sq ft | Compacted structural sub-base |
| Gravel base | 6 in | 54 sq ft | Driveways and heavy loads |
| Polymeric sand | Joint fill | 75–100 sq ft/bag | Locks joints, resists weeds |
📏Edging Bricks per Foot
| Edging Brick Width | Orientation | Bricks / Foot | Bricks / 10 Ft | Notes |
|---|---|---|---|---|
| 3.625 in | Brick-on-edge, laid flat width | 3.31 | 34 | Standard modular brick |
| 4 in | Paver on edge | 3.00 | 30 | 4×8 paver stood narrow side |
| 6 in | Square paver on edge | 2.00 | 20 | 6×6 soldier border |
| 8 in | Paver laid end to end | 1.50 | 15 | 4×8 sailor course |
| 2.25 in | Thin brick soldier | 5.33 | 54 | Tight vertical soldier row |
Edging count = border length in inches ÷ brick width in inches. One foot equals 12 inches.
🗂Paver Comparison Grid
| Paver Size (in) | Plan Dims (ft) | Per Sq Ft | Per 100 Sq Ft | Typical Waste | Typical Use |
|---|---|---|---|---|---|
| 4 × 8 | 0.333 × 0.667 | 4.50 | 450 | 10–15% | Herringbone paths |
| 6 × 6 | 0.5 × 0.5 | 4.00 | 400 | 5–8% | Simple garden paths |
| 6 × 9 | 0.5 × 0.75 | 2.67 | 267 | 8–12% | Holland driveways |
| 8 × 8 | 0.667 × 0.667 | 2.25 | 225 | 5–8% | Grid courtyards |
| 8 × 16 | 0.667 × 1.333 | 1.13 | 113 | 8–10% | Plank patios |
| 12 × 12 | 1.0 × 1.0 | 1.00 | 100 | 5% | Pool decks |
| 12 × 18 | 1.0 × 1.5 | 0.67 | 67 | 5–8% | Modern large slabs |
| Brick-on-edge | 0.302 × 0.667 | edging only | 34/10 ft | 5% | Bed and ring borders |
⚙Full Formula Breakdown
📋Reference Values
| Item | Common Entry | How It Is Used | Effect on Order |
|---|---|---|---|
| Joint width | 1/8 to 1/2 in | Added to paver L and W | Wider joints lower paver count |
| Pattern waste | 5% to 18% | Multiplies base count | More cuts need more pavers |
| Bedding sand | 1 in typical | Depth in sand volume math | Deeper bed adds cubic yards |
| Polymeric sand | 75 to 100 sq ft/bag | Divides paved area | Wide joints need more bags |
| Edging width | 3.625 to 8 in | Divides border inches | Narrow bricks need more pieces |
💡Practical Landscaping Tips
Start with an idea in your head. Would you like a nice clean walkway up to the back door? Would you like a comfy new stone patio for morning coffee?
Next thing you do is grab a tape measure and stand in the yard. And suddenly, it’s already starting to get complicated. How many pavers will I need for that square footage? How much sand will I need under there? What about all those edging bricks defining my border? Just how many of those will I need exactly?
How to Plan Your Paver Project
Sounds easy enough…until you remember: Each time you cut something down, you’ll have waste. Each different pattern will change things a lot. Before long, you’ll either blow your budget or realize you ordered too little.
The calculator does all the heavy lifting here. Just feed it your dimensions and it spits out your exact materials list. No more digging yourself into a hole with too much surplus or going over budget because you ordered too little.
The decision on which size of pavers you select will set the tone for the rest of your project. Traditional is a standard four-by-eight inch brick. They is good for a herringbone pattern where you need to do more cutting. Moddern slabs would be bigger, like twelve by twelve. It is quicker to lay down but heavier to carry. It is also less flexible on uneven terrain.
This is all laid out in a handy reference table on the page. You can see at a glance how much you need per square foot based off the plan view dimensions. Pick the aesthetic first, let the numbers follow.
Most DIYers fall into the waste trap. For example, a simple run of pavers laid in a straight running bond pattern will yield about five percent waste to allow for edge cuts. Change that same run to a herringbone layout with 45 degree angles and all of a sudden you’re talking fifteen to twenty percent wasted material. Why? Because nearly every piece at the edges requires some sort of trim.
That’s why the waste multiplier is built right into total count on the calculator. What that means is that when it spits out its number, that’s the amount you need to order from supplier. Don’t round down! Mismatching paver batches is a sure way to be disappointed; and short on material mid-project.
The foundation beneath all those lovely stones holds it all together and levels everything out. And no, bedding sand isn’t just filler material. It’s also the layer that gets the pavers individually tapped into place so they’re perfectly aligned. Typically, there should be a gravel base followed by an inch-ish of compacted sand on top.
The tool calculates that for you in cubic yards, which can help you figure out how much to order (from a masonry supply yard) or what size dump trailer to rent. If you don’t properly compact the sub-base, your sand will get shifted around by foot traffic and your nice-looking patio will become a wobbly nightmare in a matter of seconds.
Projects are really won or lost with edging…people forget to factor it in entirely! If you don’t have good restraint around the edges of the project, the modular pavers will eventually expand due to thermal expansion. They will also move because of soil movement and creep out over time.
You will want to add the linear footage of your perimeter separately from the surface you are paving. Depending on whether you’re using larger square pavers on their sides or just standard modular bricks on edge, you’ll want to figure out how much linear footage you have to work with. The calculator changes to work in this linear measurement. It breaks down the total linear footage of your border into segments based on width of the brick selected. This ensures you have enough to establish a hard stop to keep all the pieces in check.
After laying down your stone, you’ll want to fill in the gaps (or ‘joints’) between each piece of stone using polymeric sand, which locks everything in place and prevents weeds from growing. To calculate how much you’ll need, consider the overall square footage of where you’re working plus an allowance for joints.
Joints can be narrow or wide. The narrower they are, the more precise you must be when installing, though fewer materials is needed. Wider ones mean you can wiggle things a little bit but it will take more product. It is a little thing that makes a big difference in the long run.
Remember: Measure what you’re actualy building. Plug those measurements into the calculator. For complicated spaces, simplify things into rectangles, remembering to account for odd angles and other curvy bits. If you’re not sure of your cutting skills, leave a bit more wiggle room than you think you’ll need. The idea is to avoid rushing back to the hardware store because you didn’t have enough left to finish neatly.
With good plans, you’ve got good numbers. With good numbers, you’ve got a great project. With a great project, you’ve got an outdoor space you want to stay in even longer. Because you nailed it down, literally (now you can enjoy it completely).