Drywall Layout Calculator
Plan how sheets sit on a single wall. See full sheets across and up, the leftover offcut strip, tapered edge seams, butt joints, and whether horizontal or vertical hanging leaves fewer seams to finish.
📌Real Wall Layout Presets
📝Wall & Sheet Inputs
Horizontal run of the wall, corner to corner.
Floor to ceiling on this wall.
Doors or windows fully inside the wall face.
Extra sheets for bad cuts and damage.
🔢Layout Snapshot
⚖Horizontal vs Vertical For This Wall
| Metric | Horizontal | Vertical | Lower Is Better | Winner |
|---|---|---|---|---|
| Enter a wall above to compare both orientations. | ||||
📐Orientation Pros And Cons
| Orientation | Seam Pattern | Pros | Cons | Best For |
|---|---|---|---|---|
| Horizontal | One long seam mid-wall | Fewer seams, seam at eye level, stronger wall | Long butt joints if wall exceeds sheet length | 8 ft and 9 ft walls, pro finishers |
| Vertical | Seams follow the studs | Every seam lands on a stud, easy solo hanging | More vertical seams on long walls | Tall walls over 8 ft 1 in, DIY |
| Auto | Whichever is lighter | Picks the fewest seams plus butt joints | May switch as sheet length changes | Planning before you buy sheets |
📏Sheet Length To Butt Joints (12 ft Wall)
| Sheet Length | Covers | Sheets Per Row | Butt Joints (H) | Note |
|---|---|---|---|---|
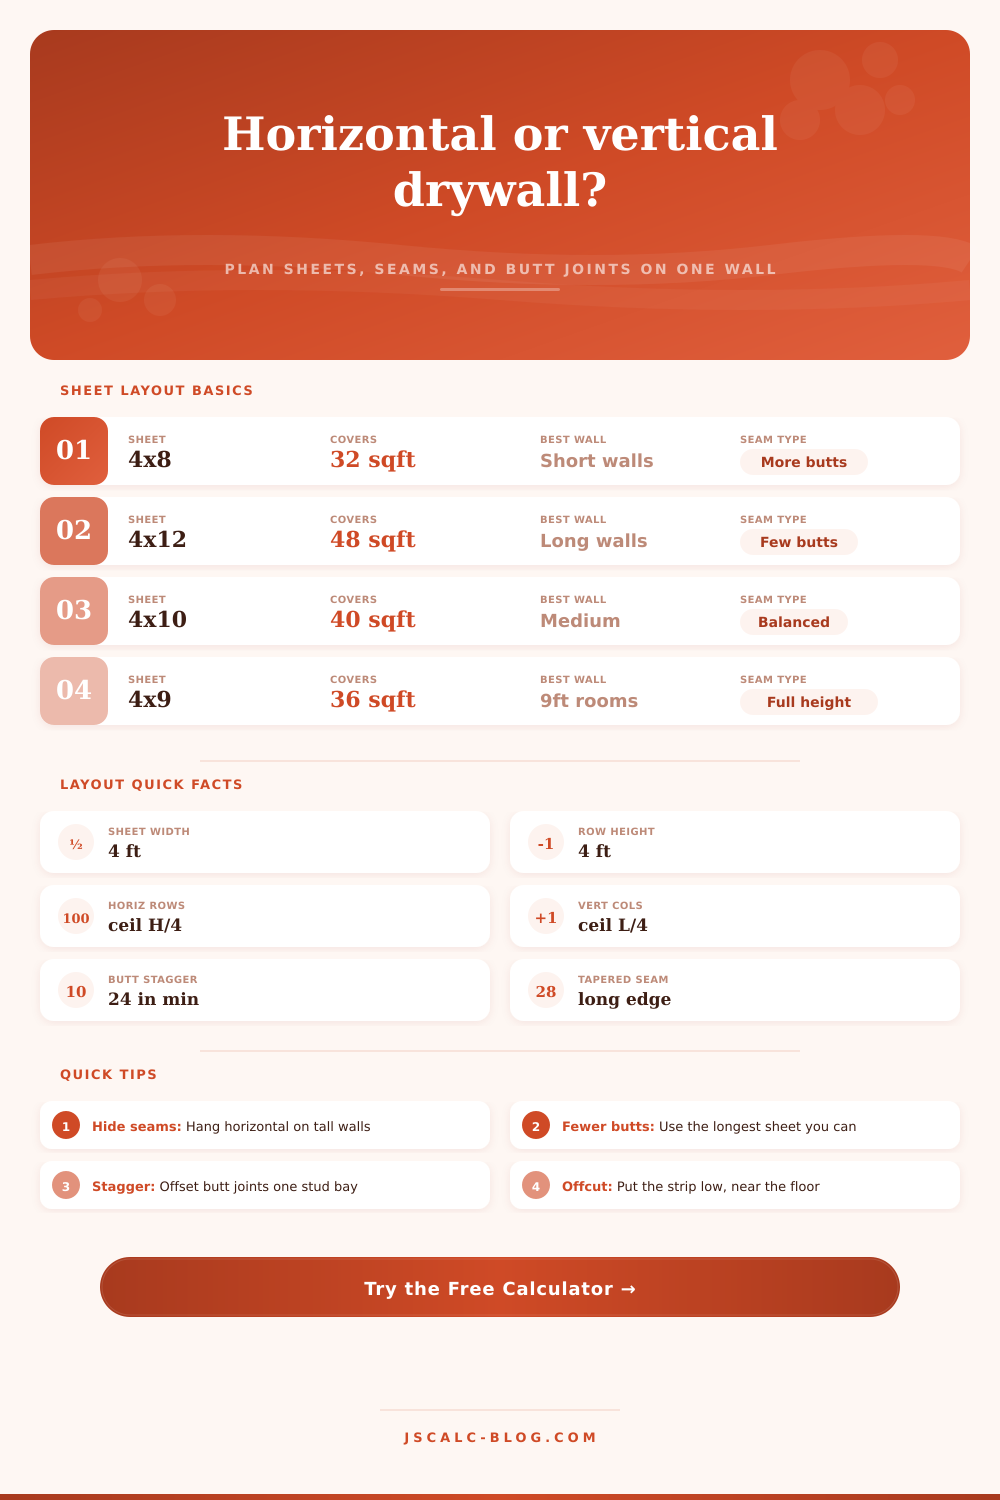
| 4 x 8 ft | 32 sq ft | 2 per row | 1 per row | Common, most butt joints |
| 4 x 9 ft | 36 sq ft | 2 per row | 1 per row | Matches 9 ft ceilings |
| 4 x 10 ft | 40 sq ft | 2 per row | 1 per row | Shorter offcut than 12 ft |
| 4 x 12 ft | 48 sq ft | 1 per row | 0 per row | No butt joint on a 12 ft wall |
| 4 x 14 ft | 56 sq ft | 1 per row | 0 per row | Spans wide walls seam-free |
| 4 x 16 ft | 64 sq ft | 1 per row | 0 per row | Heavy, needs two people |
⚙How The Layout Math Works
🗂Layout Comparison By Wall Size
| Wall (L × H) | Sheet | Horiz Sheets | Horiz Seams+Butts | Vert Sheets | Vert Seams+Butts | Best Choice |
|---|---|---|---|---|---|---|
| 8 × 8 ft | 4 × 12 | 2 | 1 + 0 | 2 | 1 + 0 | Tie, hang horizontal |
| 12 × 8 ft | 4 × 12 | 2 | 1 + 0 | 3 | 2 + 0 | Horizontal |
| 16 × 8 ft | 4 × 8 | 4 | 1 + 2 | 4 | 3 + 0 | Horizontal |
| 10 × 9 ft | 4 × 10 | 3 | 2 + 0 | 3 | 2 + 0 | Tie, vertical solo |
| 12 × 10 ft | 4 × 12 | 3 | 2 + 0 | 3 | 2 + 0 | Tie, vertical is easier |
| 20 × 9 ft | 4 × 10 | 6 | 2 + 3 | 5 | 4 + 0 | Horizontal, fewer joints |
| 24 × 8 ft | 4 × 12 | 4 | 1 + 2 | 6 | 5 + 0 | Horizontal |
| 6 × 12 ft | 4 × 12 | 6 | 2 + 3 | 2 | 1 + 0 | Vertical, tall wall |
💡Practical Layout Tips
While it might appear smooth from across the room, up-close you’ll see ridges on drywall. Typicaly that’s not due to bad taping but rather poor planning. Drywall isn’t just about lifting sheets and hoping for the best. It’s a geometry problem that gets solved with compound and tape. Plan the layout first; save time and ensure bumps won’t be seen under paint.
Once you input your wall size, our calculator do the math for you so you don’t have to guess how panels should be oriented. What’s the primary option? That’s right: vertical or horizontal hanging. It seem like a small visual difference. However, the way you hang something affect its final look and how sturdy it is.
Plan Your Drywall Layout First
Horizontal. Sheets goes up sideways across the studs, making two rows on an eight-foot-high ceiling. A horizontal seam wraps around eye-level height.
Vertical. Sheets stack from floor-to-ceiling; one 12-foot-long sheet per column on this wall. No horizontal seams at all with vertical hanging, just vertical seam between each panel.
Because there are fewer seams and tapered seams can be hidden under lights where they’re not noticed as much, pros tend to favor horizontal hanging. DIYers tend toward vertical since it’s easiest to lift one big sheet then to coordinate a pair of wide ones on a ladder.
Know how to differentiate between butt joints and tapered seams. Butt joints are raw cut ends and are uniformly thick, so there is no naturaly slope for the mud. Tapered seams are factory edges that are slightly thinner toward the outside edge than in the middle. Tapered seams allow the mud to feather out and give you an invisible blend; filling a butt joint take more skill and more material (it can’t help but have some kind of ridge). Use more tapered seams and fewer butt joints in your layout strategy.
When your wall is longer than the length of the sheet, you’ll unavoidably make some butt joints. You can control whether they occurs at the end of long walls or frequently throughout. These are a few rules.
Don’t ignore the staggering joints: For vertical hanging, offset the top edges. If they are all lined up, you have a continuous crack across the wall that is only held together by drywall. On its own, drywall has zero shear strength. It relies on screwing through it into studs for support. When house moves as it settles or shifts, a continuous joint without any stud backing will crack. To distribute the load and break up these weak lines, stagger your rows by at least one stud bay. Doing this also breaks up the grid pattern of unfinished construction which look better.
A budget can easily be blown because of waste. Drywall is brittle; it chips when you cut, bends and snaps at the frame corners, etc. Plan accordingly based off your material estimate. Assuming minor errors and random cuts around openings, plan for approximately a ten percent waste factor. If there are numerous opening in the wall, add another five or ten percent (fifteen or twenty percent total). Better to purchase one additional sheet today than run back to the store realizing that you’re short on the last piece.
You want it to look nice, and a good layout will not only make your life easier but strengthen the wall at the same time. More important than just the orientation of seams is knowing how they’ll relate to framing. Hide butt joints and follow the studs. Cut things right so that what’s essentially a flimsy wall turns into one that looks like it was made for a finished house, you should of planed ahead.