Contents
Creating a new calculator
To create a new calculator, click on the +Calculator on the navigation bar.

Before you start coding, click on the button .
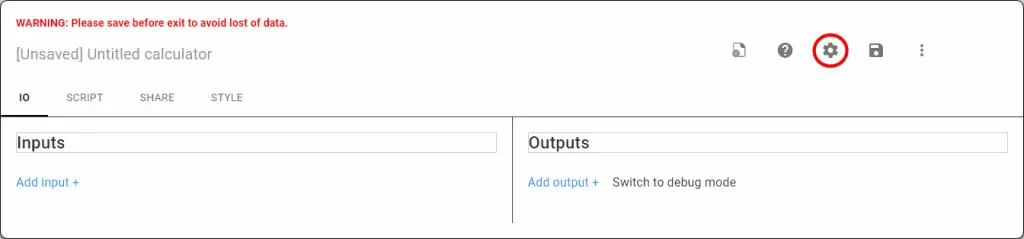
This is where you can configure the settings of the calculator:
- Add/edit the title of the calculator
- Set the tab size for your script editor
- Choose libraries to include in your code (Lo-Dash, Moment.js, or Math.js)
- Choose localization (English or Russian)
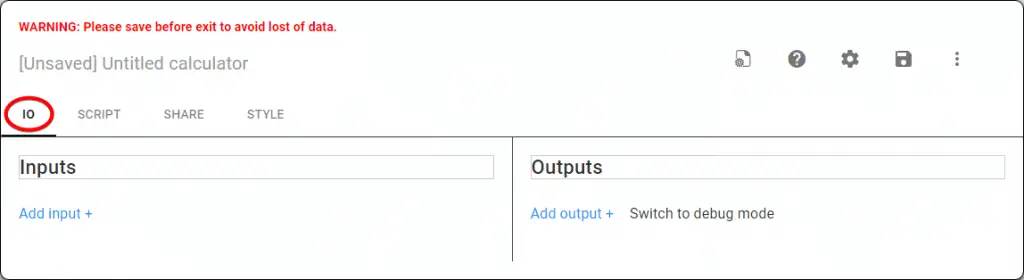
IO – Input Output
The IO tab is where you add/edit input and output for your calculator.
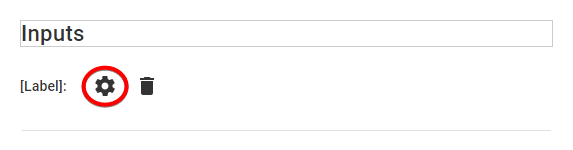
You can choose the type of input/output to use. Configure the settings by clicking the button on the added input. Here, you can make changes to the property name, label, and position of the input/output.
The following table explains the extra settings function of the input and output.
| Input | Settings |
| Numbers | ‘Display Slider’: A slider as an alternative for entering a value. |
| Date | 1. The value ‘0’ holds the present date. 2. Increment/decrement in values entered is the day/month/year from/before the present date. 3. Switch to absolute/relative date: Change the input format. |
| Radio/Dropdown | 1. Control type: Choose radio or dropdown. 2. Add choice: To add and edit choice. |
| Output | Settings |
| Value | 1. Decimal places: Set the decimal place of the output. 2. Currency sign: Place a currency sign in front of the output. 3. Display in percent: Calculates and displays the output in percentage (%). |
| Table | Columns: Add and edit columns to display your output. |
| Others | Settings |
| Defaults (Under an added input) | 1. Update defaults: Set a default value to an input. 2. Load defaults: Return the value of the default input. |
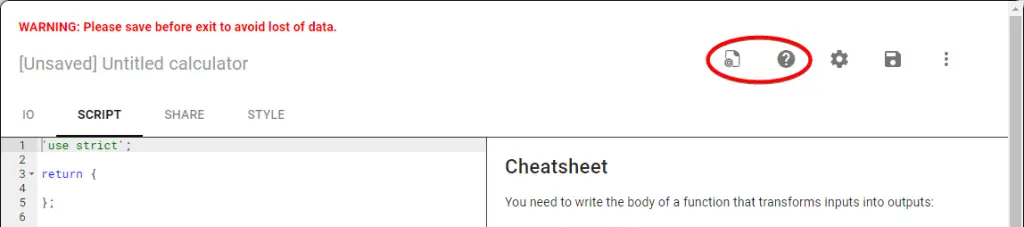
Script
The SCRIPT tab is where you write your codes in JavaScript.
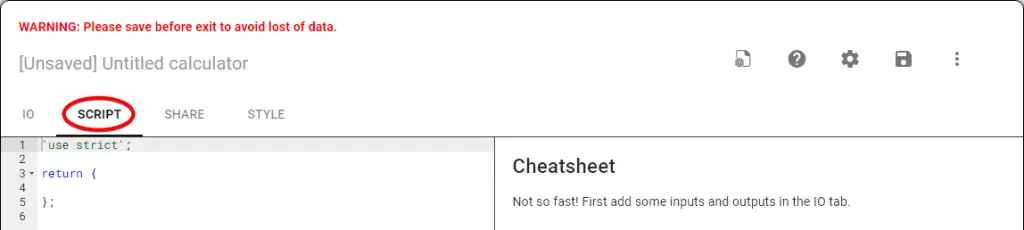
You can refer to the Cheatsheet () for guidelines, but first, you need to add the input and output. If you can’t code in JavaScript, feel free to use our Script Helper (![]() ) and have a look at these examples.
) and have a look at these examples.
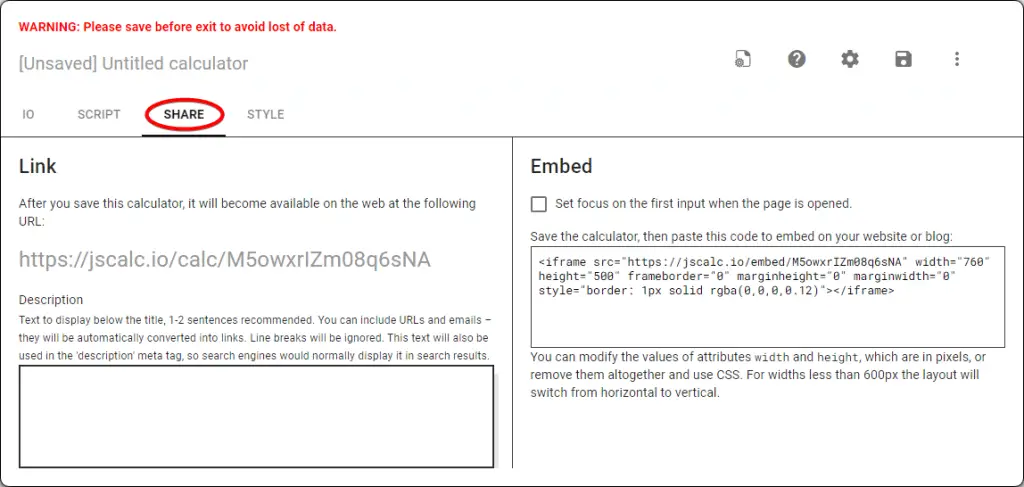
Share
The SHARE tab is where you can find the link and codes to embed your calculator. You can also write a description to further explain the calculator.
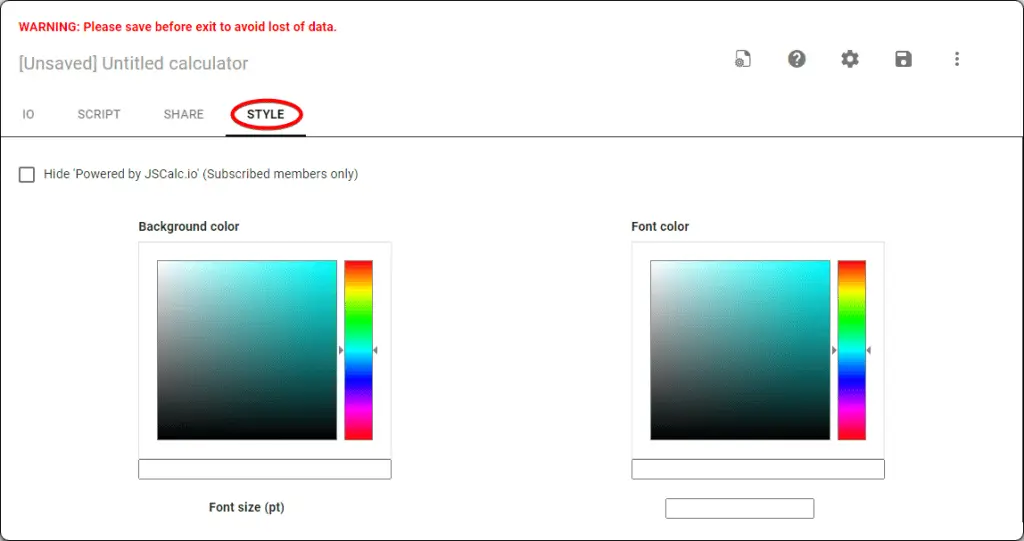
Style
You can style your calculators by changing the background color, font color, and font size in the STYLE tab. Changes can be seen when you open the link to your calculator in another tab.
How to use the JSCalc Script Helper
The JSCalc Script Helper consists of pre-programmed buttons that will help you generate codes in JavaScript. There are buttons for mathematical operators, conditional operators, and also custom inputs.
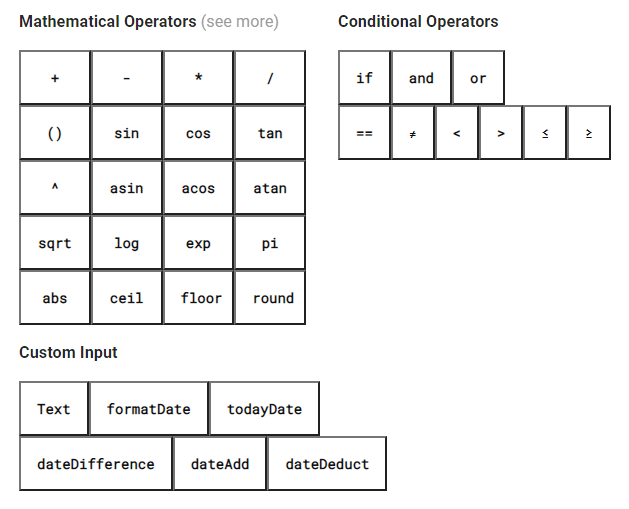
Mathematical Operators
The following table describes the function of each Mathematical Operator button.
| Buttons | Description |
|---|---|
| + | Calculates addition. |
| – | Calculates subtraction. |
| * | Calculates multiplication (×). |
| / | Calculates division (÷). |
| () | Brackets. |
| ^ | Calculates the value to the power of an exponent. |
| sin | Calculates the sine of a value. |
| cos | Calculates the cosine of a value. |
| tan | Calculates the tangent of a value. |
| asin | Calculates the inverse sine of a value. |
| acos | Calculates the inverse cosine of a value. |
| atan | Calculates the inverse tangent of a value. |
| sqrt | Calculates the square root of a value. |
| log | Calculates the logarithm of a value. |
| exp | Calculates the exponent of a value. |
| pi | Returns PI (3.142) |
| abs | Calculates the absolute value of a number. |
| ceil | Rounds a value towards plus infinity. |
| floor | Rounds a value towards minus infinity. |
| round | Rounds a value towards the nearest integer. |
Multiply (*) and Divide (/) Buttons
In the following example, we will calculate two values using the multiply (*) and divide (/) buttons.
Create a new calculator and add four number inputs with property names input1, input2, input3, and input4. Add two outputs with property names multiply_answer and divide_answer. Next, click on the Script Helper (![]() ) and place your text cursor between {} on line 4 in the script editor. Click on the value multiply_answer button, which will be the output for multiplication. Then select number input1, multiply (*), and number input2 buttons and click Done.
) and place your text cursor between {} on line 4 in the script editor. Click on the value multiply_answer button, which will be the output for multiplication. Then select number input1, multiply (*), and number input2 buttons and click Done.
In the script editor, on a new line (line 5), repeat the above steps for division using value divide_answer, divide (/), input3, and input4 buttons.
When selecting the buttons, your Script Helper box should look like this:
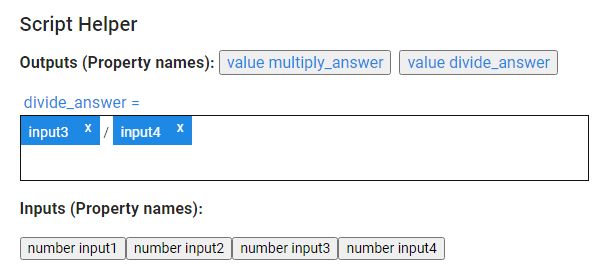
Click Done and your script editor should have the following codes:
'use strict';

return {
multiply_answer: inputs.input1*inputs.input2,
divide_answer: inputs.input3/inputs.input4,
};
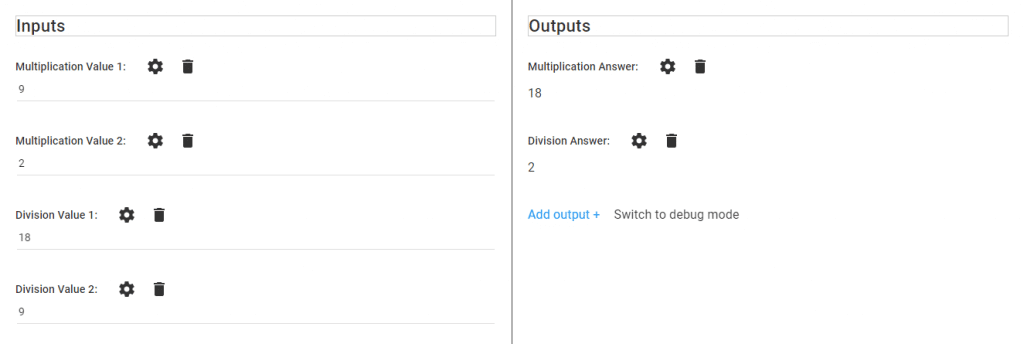
Your IO tab should look like this:
The same steps can be used for the plus (+) and minus (-) buttons. You can have more input/output in a calculator depending on how you create it. Just remember to select the correct buttons.
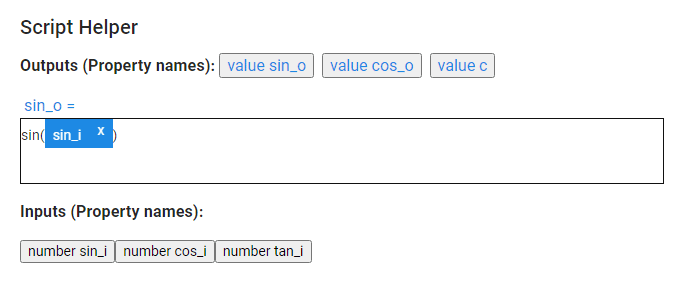
Sin, Cos, and Tan Buttons
Next, we are going to show how the sin, cos, and tan button works. In the IO tab, add three number inputs and value outputs. Configure them accordingly; in this example, the input property names are sin_i, cos_i, and tan_i and sin_o, cos_o, and tan_o for output.
Click on the Script Helper (![]() ) and place your cursor in the script editor between {} on line 4. Select the value sin_o button, followed by the sin button. In the Script Helper box, highlight ‘value‘ in brackets and replace it by clicking the number sin_i button. Click Done.
) and place your cursor in the script editor between {} on line 4. Select the value sin_o button, followed by the sin button. In the Script Helper box, highlight ‘value‘ in brackets and replace it by clicking the number sin_i button. Click Done.
Your Script Helper box should look like this before clicking done:
Make a new line on line 5 and repeat the steps above for cos and tan buttons accordingly. Your script editor should have the following code.
'use strict';
return {
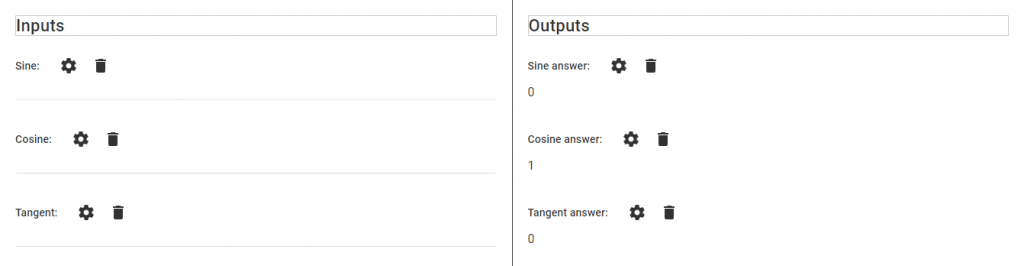
sin_o: Math.sin(inputs.sin_i),
cos_o: Math.cos(inputs.cos_i),
tan_o: Math.tan(inputs.tan_i),
};
Your IO tab should look like this:
Similar steps can be done for the rest of the Mathematical Operators buttons except for ^, log, and pi buttons, which will be detailed below.
Exponentiation (^), Log, and Pi Buttons
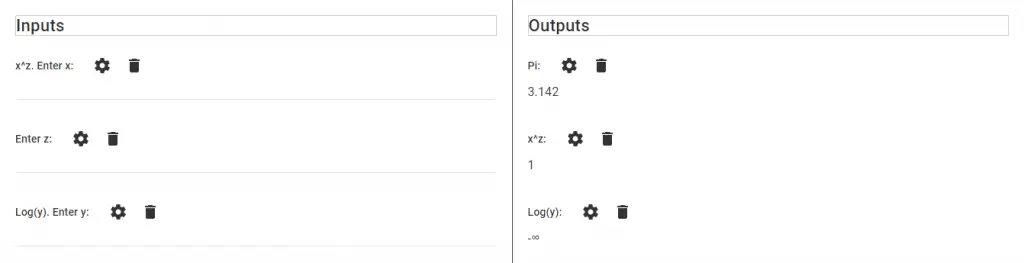
To use the exponentiation (^) button, it is required to enter two inputs, value and exponent or you can pre-set the exponent to any number. Similarly, the log button requires inputs for value and base. The pi button doesn’t require any input; it holds the value of pi (3.142).
Below are examples for ^, log, and pi button.
'use strict';
 return {
 exp_o: Math.pow(inputs.input_exp,inputs.input_exp_z),
 log_o: Math.log(inputs.log_input, 10),
 pi_value: Math.PI,
 };
Conditional Operators
The following table describes the function of each Conditional Operators button.
| Buttons | Description |
|---|---|
| if | Executes a specified block of code if a condition is true. |
| and | Executes a specified block of code if a set of conditions is true, if and only if all conditions are true. (&& operator) |
| or | Executes a specified block of code if a set of conditions is true, if and only if one or more of the condition is true. (|| operator) |
| == | Returns true if two values are equal, otherwise returns false. |
| ≠ | Returns true if two values are not equal, otherwise returns false. (!== operator) |
| < | Returns true if the left value is less than the right value, otherwise returns false. |
| > | Returns true if the left value is greater than the right value, otherwise returns false. |
| ≤ | Returns true if the left value is less than or equal to the right value, otherwise returns false. (<= operator) |
| ≥ | Returns true if the left value is greater than or equal to the right value, otherwise returns false. (>= operator) |
If, and Not Equal To (≠) Buttons
In this example, we are going to show you how to use the if, and ≠ buttons.
Firstly, create a question with answer choices (see image below). Choose Radio/Dropdown as your input. And configure the settings accordingly.

Open the Script Helper (![]() ) and place your type cursor on line 4 between {} in the script editor. Select your output button. Next, click on the if button. Replace condition by clicking your input button, the ≠ button, followed by typing ‘[your input property name]’ of the fourth radio option. Replace true with “Guess again” and false with “Correct!”.
) and place your type cursor on line 4 between {} in the script editor. Select your output button. Next, click on the if button. Replace condition by clicking your input button, the ≠ button, followed by typing ‘[your input property name]’ of the fourth radio option. Replace true with “Guess again” and false with “Correct!”.
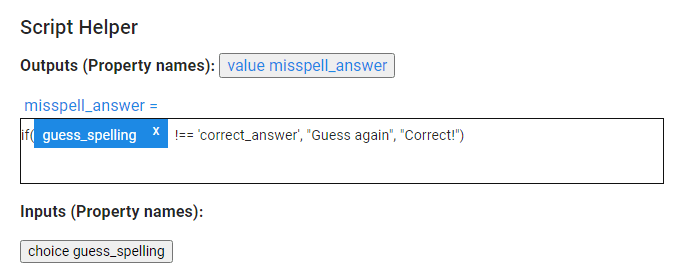
Once you click Done, your codes should look like this:
'use strict';
 return {
 misspell_answer: inputs.guess_spelling!=='correct_answer'? "Guess again": "Correct!",
 };
Your output should display this:

When a user selects the three misspelled choices, the output will show “Guess again”, because when any input that is not equal to correct_answer will display the true value. While when the user selects the fourth option, the output will display the false value which is “Correct!”.
If, And, and Equal to (==) Buttons
In this example for the and button operator, let’s create a calculation to understand how the and (&&) operator works.
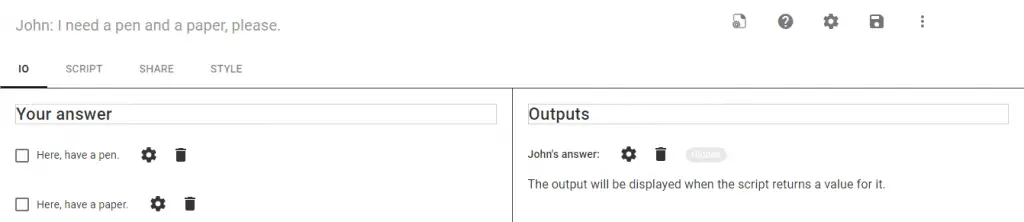
Name your calculator “John: I need a pen and a paper, please.” Add two checkbox inputs and name them “Here, have a pen.” and “Here, have a paper.” respectively. Add a value output and name it “John’s answer”.
Using the Script Helper, on line 4, click on your output button. Select if, and replace condition by clicking your input pen button, then the == button, followed by typing true. Continue with selecting the and button, your input paper button, the == button, and typing true. Then, replace true with “Thank you.” and false with “I need both paper and pen.”
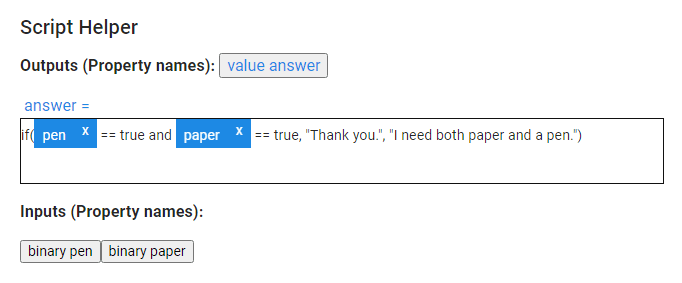
After clicking Done, your codes should look like this:
'use strict';

return {
answer: inputs.pen == true && inputs.paper== true? "Thank you.": "I need both paper and a pen.",
};
Your output should display this:
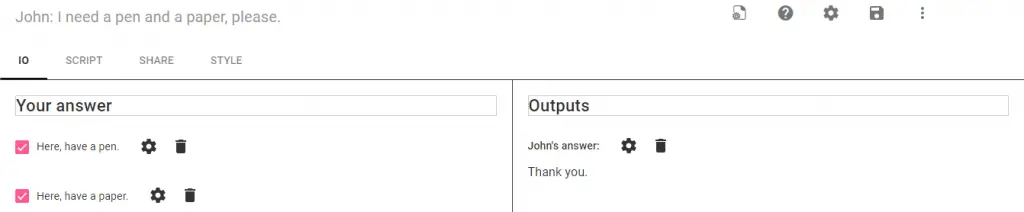
The and (&&) operator displays the true command when both checkboxes are ticked (both inputs carry true value). When only one of the checkboxes is ticked, the output will display the false command. So, the output will display “Thank you.” because John needs both pen and paper, otherwise it will show “I need both paper and pen” because John doesn’t get both of what he needs.
Or, Greater than (>), and Less than (<) Buttons
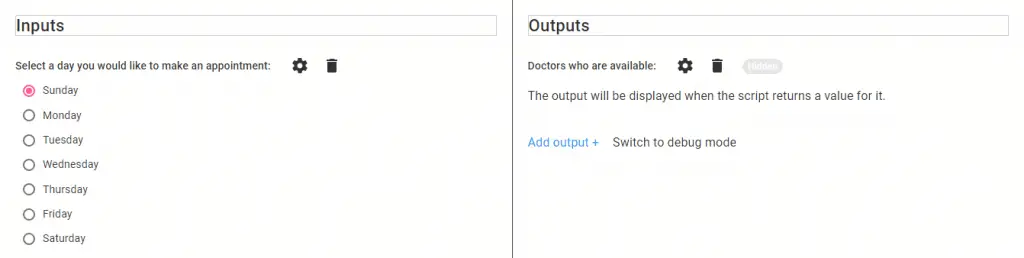
In this next example, let’s create a Doctors’ Availability Schedule by using the or, >, and < buttons.
Add a Radio/Dropdown input to the new calculator, and create six radio buttons with all the names of the days in a week. The output will show the names of doctors who are available on a selected day.
Using the Script Helper, select your output button and click on the if button. Replace condition by clicking your input button, select the < button, type number 2, select the or button, followed by your input button again, the > button, and then type the number 5. Replace true with “Dr. Au” and false with “Dr. Hale”.

After clicking Done, your codes should look like this:
'use strict';

return {
doctor: inputs.days<2 || inputs.days>5? "Dr. Au": "Dr. Hale",
};
Your output should display this:
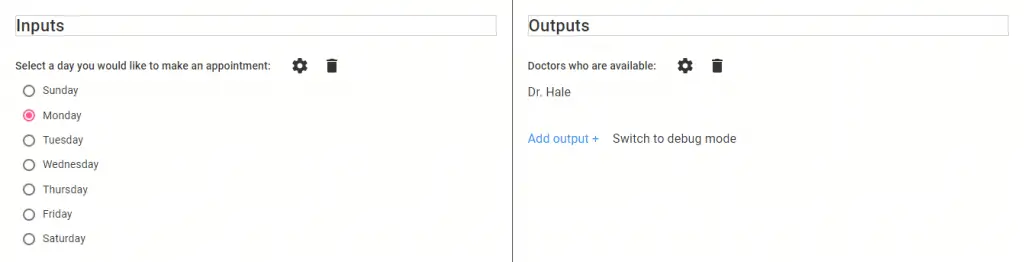
The or (||) operator returns the value true when one or both of the expressions are correct. Sunday is given the value 1 and the number goes on in ascending order until 7, for Saturday. Dr. Au is working on Sunday, Friday, and Saturday. So when the input is less than 2 (1 = Sunday) or when the input is more than 5 (6 = Friday, 7 = Saturday), the output displays ‘Dr. Au’, otherwise Dr. Hale is available, who is on duty for the rest of the days.
Custom Input
The following table describes the function of each Custom Input button.
| Buttons | Description |
|---|---|
| Text | Returns text content. |
| formatDate | Changes date format (read more). |
| todayDate | Displays today’s date. |
| dateDifference | Displays the time difference between two dates in millisecond, second, day, week, month, or year (read more). |
| dateAdd | Adds specified time to date. |
| dateDeduct | Deducts specified time to date. |
Text, todayDate and formatDate Buttons
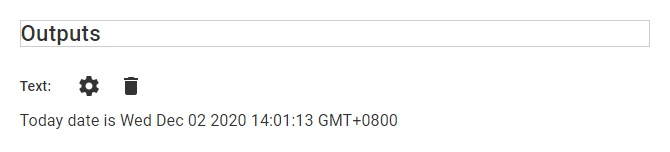
In this example, start by ticking the Moment.js option on your calculator settings. Add a value output in the IO tab. By using the Script Helper, select the Text button to display “Today date is “. Continue with typing “+” on your keyboard and click on the todayDate button.
Your output will display this:
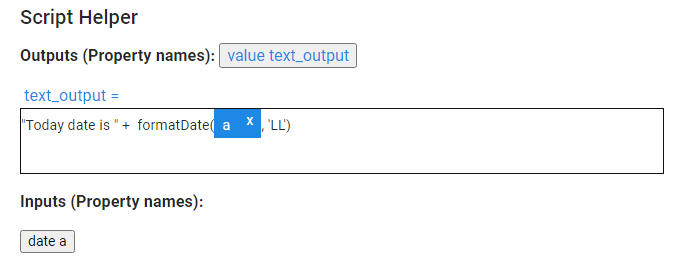
The default date format is less suitable to be in a casual sentence, so change the date format using the formatDate button. The formatDate button requires a date input; add one in the IO tab and clear your previous codes.
Like the previous step, type “”Today date is ” +”. Select the formatDate button and replace date with an input date, and replace format with ‘LL’.
Once you click Done, your codes should look like this:
'use strict';

return {
text_output: "Today date is " +moment(inputs.a).format('LL'),
};
Your output should display this:

You can choose to change the date to any other format using the formatDate button as documented in Moment.js.
dateDifference Button
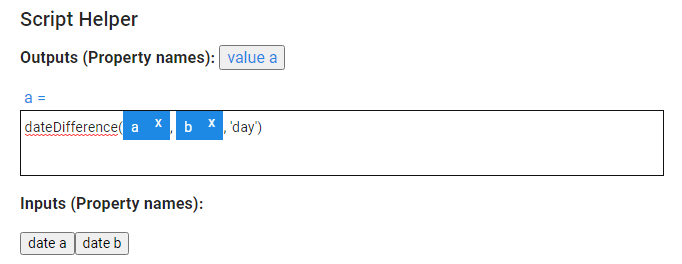
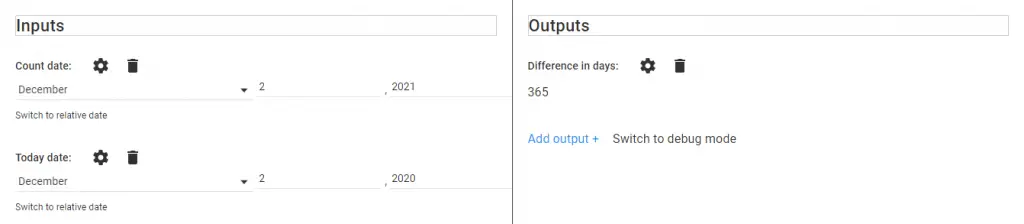
In this example, the Moment.js library is also required. Add two date inputs and a value output in the IO tab. With the Script Helper, select the output button and click on the dateDifference button. Replace date1 and date2 with the date input buttons respectively. Replace counter with “‘day'”.
Your Script Helper should look like this:
Once you click Done, your codes should look like this:
'use strict';

return {
a: moment(inputs.a).diff(inputs.b, 'day'),
};
Your output should display this:
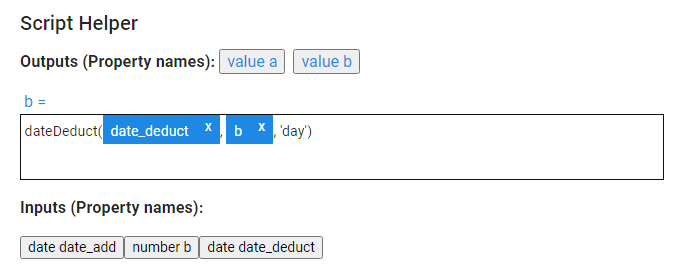
dateAdd and dateDeduct Buttons
For this next example, add two date inputs, a value input, and two value outputs in the IO tab. By using the Script Helper, choose the first output and select the dateAdd button. Replace date with the assigned date input, replace number with the number input, and counter with “‘day'”.
Use similar steps for the dateDeduct button.
Your Script Helper should look like this:
Once you click Done, your codes should look like this:
'use strict';

return {
a: moment(inputs.date_add).add(inputs.b, 'day').calendar(),
b: moment(inputs.date_deduct).subtract(inputs.b, 'day').calendar(),
};
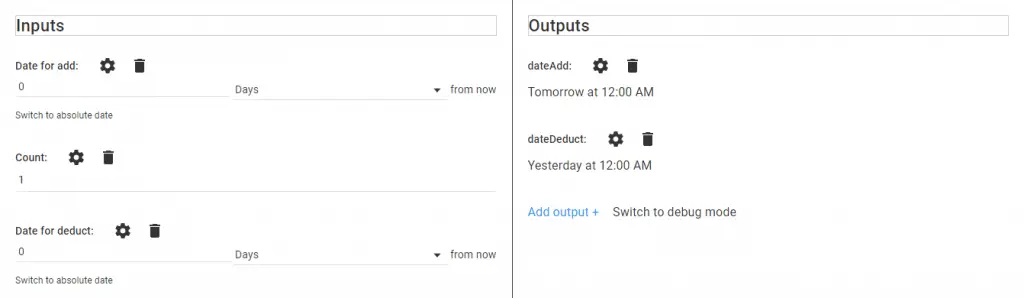
Your output should display this: